Wednesday, July 31, 2013

The Duke, John Wayne


Who hasn't sat down in front of a television on a Saturday, and watched the screen come alive with horses, and cowboys, and indian. I have to say my favorite is John Wayne.  "The Cowboys" movie brought me to tears, had me cheering, but mostly just having an enjoyable afternoon. So of course I had to try my hand at this Great Figure of a Man that kept me, and many of us glued to the house on a Saturday afternoon.

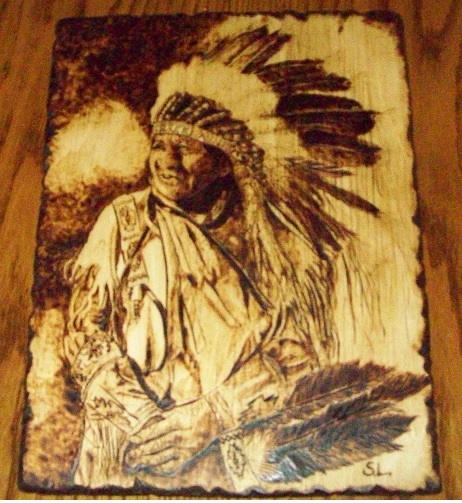
Its pretty intimidating to work on someone's picture that the whole world knows in just a glance. Much less to actually study the picture. But nothing ventured nothing gained.  Here are a couple of  pictures of my version of John Wayne. :)


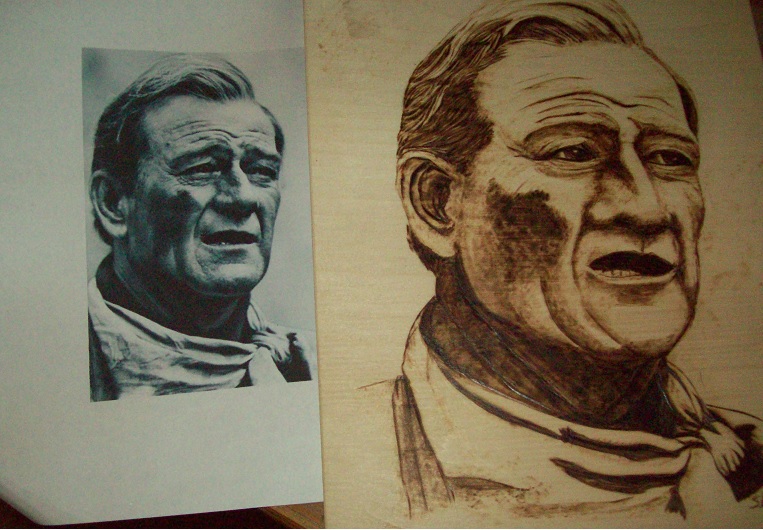
Picture I looked at and  the picture that is over halfway finished.


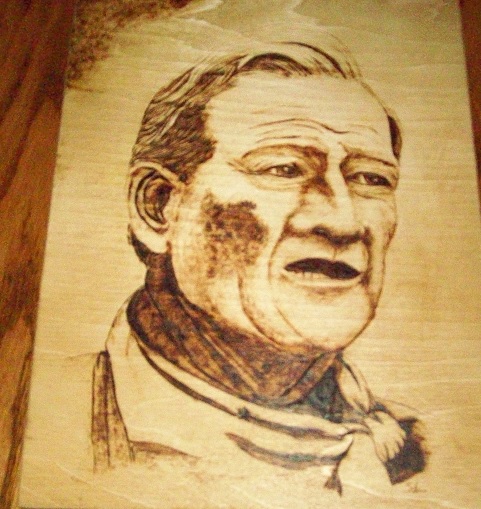
A little more shading and stain. Then  next will be the sealing:)
And as John Wayne said as Hondo Lane (Hondo):
"Yup. The end of a way of life. Too bad. It's a good way. Wagons forward! Yo!"

A Man's Tiger and Dragon Case


Had a person to commission me to make him a case to carry around his notepad and files. That would have a strap that could loop around his neck and shoulders, to keep his hands free, and rest on his side. He showed me a picture of a dragon and tiger emblem, and gave a general idea of the background colors, strap, and clasp that he wanted on it. So the venture begins.

After spending several hours in a craft shop drooling over all the goodies on the  shelves. I picked out what I thought would be the right size for this case, standard wooden box, with hinges.. 9 inches by 11 inches.
Here is the idea for the picture he wanted on his case.   


                       lovely vibrant colors


Since the background of the figures had a varied shading around the center with paints I decided to do my background to the dragon and tiger like this.
Very simple stippling, but 5 hours of work. Done in different directions and heat which gives it a skin texture, ( or to my eyes its does).  This is the wooden case after wood burning.


As you can tell it's pretty but not near as vibrant as the copy that was given to me. So after a little pondering. This is what I came up with,water color glazings;( by mixing watercolor powders to a little clear acrylic sealer), and then letting them merge at the edges. Then using a dark cherry wood stains around the emblem.  I ended up with this. 


Next I will need to seal the box inside and out, and put the straps and Clasps on it. For today this is it:)

Sunday, July 28, 2013

Indian Maiden

Having done an Indian Chief, it was nothing fair but try an Indian Maiden.
After finding the picture that hit my imagination. I first had to print,trace out the general forms then outline them. As in the picture below.


Then I worked on the main figures and started filling them in.


This was day ones work. Tracing, Outlining with soldering iron and then the starting of filling it in.

Here is the final picture after staining

Friday, July 26, 2013

Indian Chief

I started a new project this week of an Indian Chief. There was so much character and life showing on the face it just called to me to test my skills. After printing, and tracing the main shapes, I start to burn. I learned a very good lesson. The next time I have the urge to test my skills to first think about how much time I am willing to spend on such a venture, and to remember I am not on a time clock,nor is it a rush order.  I spent way too many late and long hours on this picture.   

After 2 days of burning this was as far as I got. Not bad but still needing a lot of work done on it.


So I continue to do the detail for another 6 hours. Until it was ready for the framing.

Framing to me is always a puzzle. You want something that is going to work well, but not take away from your wood burning, and will show the work off to the best advantage. After much discussion with friends and family I finally settled on the burned edge with filing . A rather long process.

I first took my dremel and filed or distressed the edges .


Then I had to smooth off the edges before burning the edges with the soldering iron.

I think the next time I try to do this framing I will try a torch then go back and touch up any area’s not done to correct depths of burning to use the soldering iron then. This should cut back on the time it takes to do this. 4 hours. I also burned a little on the top of the picture to get the look of singeing on the top. Next you do a light sanding. Then a light coat of golden Oak wood stain, and sealer.

Here is the finished product. I am pretty pleased with it:) What do you think?


Wednesday, July 24, 2013

The World of Wood Burners


First, I will say for some unknown reason or the blessings of the Lord above, woodburnings to me is like coloring with only two  crayolas. Black and brown and the unburned areas serving as white.

When I look at a picture I tend to see the light and dark in them when I envision doing one.  To me this makes it easier to work with.
I usually use a cheap soldering iron. 


I have the more expensive one (razertip sk) with the temp controller, but I continually find myself grabbing the old soldering iron.


I can control the shading easily depending on the pressure and speed I use, and it doesn’t burn my fingers as bad. So my advice to anyone that is going to try their hand at woodburning to go with the cheaper version first until you have whipped that tool into your control.

Secondly, you will need a very good source of protection for your fingers. I tend to work for hours and hours at a time on any given day, and heat builds up with pressure points and will leave blisters. So protect those fingers! I wrap my handle on the soldering iron with a rubber bandage you can get any Farm supply store for Animals. It clings to itself and will last for months. I will say that the razor tip is wonderful for the tiny areas that your want to shade and the soldering iron tips are just way too thick or wide to reach and not bleed over into another area.

3rd I would recommend you clean your tips often.  The buildup on the tips of any iron be it soldering or razor tips will not let you have a even line. So clean those tips its easier than having to smooth out a spot that  might not have gone as smoothly as you would have wanted them to be:)

Tuesday, July 23, 2013

Cowboy and Dog

I have been wanting a way to give my woodburnings a finished look. Thanks to Carla for the idea of filing the edges :) I think it turned out pretty good.

Sunday, July 21, 2013

Horse and Girl


Sometimes you see a picture you just have to try your hand at doing. 

Saturday, July 20, 2013

Announcement!

Announcement!

We are expecting a new member to our family in a few months. Would like you all to meet my first great granddaughter:)  No names picked out yet, but we truly do love her before she is born:)

Friday, July 19, 2013

Welcome to the World of Wood Burning Portraits

First let me say I have only been woodburning now for about 7 months. As I said earlier this was brought on by the families need to be able to breath fresh air again. ( lol) So I am pretty sure there are others out there that knows a lot more about this and who are a lot better, but this is about me so I will try my best to not even think about them at this moment. :)


When doing a portrait I usually ask for a very clear picture to be emailed to me or shared to me on Facebook. The picture below is my latest portrait and the original photo that I received.


Such a sweetheart. Couldn’t you just grab some neck sugars off that little neck!


After I get the photo. I  then take it into a photo program and will turn it into a black and white.
For me this is much easier to work with. However, I like having a colored picture to make references to when it comes time to do the eyes. Eyes to me really are the door to the soul and I think they can make or break a picture.


After I have my black and white picture, I print it out, and trace it to the wood that I have chosen for my portrait.  Now let me mention this, there are a lot of my pictures I will hand draw, and others that I will simply burn from the image in my head. But when it comes to doing a portrait I always copy, print, and trace. First because no matter how well you try to sand after burning you will usually get a few marks that come thru, and secondly because when doing a person’s portrait you want it to be as lifelike, and true as possible.


After you trace the picture then you will outline it with your soldering iron. If you are going to do a dark black ground I usually will outline it with a heavy hand. For a light background I will very often use a cooled iron and just trace it with it. I have even used a stylist to outline a project  rather than taking the chance of having a dark burned line in a place I wouldn’t want it , ( such as the nose ear,and mouth). I then will work on the face. I will do the eyes first. To me that makes the picture come alive and the rest is just a matter of filling in the blanks.
the picture you see below is of the same baby and I stopped to see if Vickie wanted the dress painted or not.. She left it up to me, so I only painted the lips with a light watercolor wash.


When using watercolors on a wood burning.. its best to seal it with before you continue on with stains.. or if you have already stained it, let it dry completely then go over the areas you want to paint and seal that before you put a sealant over the whole picture. Water paints will and do ruin. so be very careful at this stage. wash a thin line at a time and let it blend to the edge. or you will have bleeding into other areas that are very hard to sand out.


Here is where I stopped waiting for instructions  as you can tell she is almost finished and grinning at us:) . The picture below is the finished portrait .


If you have any questions please don’t hesitate to ask I am always happy to help with what I maybe know or if I don’t know the answer help with a search to find the answers:)

The World of Illustration

Zebediah
Author Patrick Simon
Book Illustration by Sharron Looney
Patrick, my dear friend that I have picked at and joked with online for many years now. He wrote a book recently, and asked if  I would do his book cover. At first my reactions was "holy cow I'm not good enough " but what came out of my font was, “Sure I would love to give it a try”.  After reading his book , his subject is so well described that I had a very good idea of what the main character would look like, and the discussions began of what Patrick saw in his mind for the book cover. He wanted it in a line drawing. Simple and eye catching, black on white. Patrick wanted his character walking toward a bridge, with hills and corn fields in the background, and a homemade bag thrown over his shoulder.  
I will admit here I did a search online about doing Illustrations and got so confused I was very much doubting my own abilities to meet this challenge. Plus I did a search on the time period to make sure I had the right image in my mind. For me doing research seems to be a major stage of any project I undertake.
So when in doubt I started doodling of the sketch he envisioned for his cover. For years I have used doodling as a way to pass time. I have never been one to sit, and hold my hands.  A day spent in a doctors office is the worse. So I carry around a sketch pad around in my purse. If I had a nickel for every monster mouth that I have made for a child waiting for an adult to get a move on, I would be rolling in money today.
First I did the drawing in pencil on printing paper. I would suggest making your first few examples more stick like until you get the layout down, before you go into a lot of detail on the drawing.  I then copy it to the computer and email it to Patrick, then he would respond with helpful hints such as : moving him a little farther from the bridge , or enlarging the hat, little things that helps a drawing give a glimpse of the  story or the main character.  I have to say, I tore up more than he ever saw.
When I had the picture he envisioned down. I then bought a mixed Media booklet and redid the picture in ink pen.
For those of you who have never tried to do a ink drawing there is one major drawback, you can't erase!  If you mess up you have to start over again from the start.  A little trick I used was to make a light pencil markings to the new page to keep the portions straight, and then used the ruler to  makes sure my drawings were the same size when it was finished.
I wish I had saved some of the pencils drawings I did so you could see the process of working over the net with another person and getting a drawing that is in someone elses mind down on paper. I loved it! The learning experience was well worth the effort.

Wednesday, July 17, 2013

Welcome to Sharron's World

Welcome to my world where everything might not be perfect, but at least I don't have to wait for the commercials to be over to continue on with my stories.

Born and raised in Texas the baby of  the family and the one most likely to be found with her nose pressed against a window trying to figure out where I belonged in the scheme of things. My mother had the natural talents of painting, and drawing. I am not sure if she passed that down to me or just I worried her to death asking so many questions and watching her that some of it has just sunk in..

Over the years I have dabbled in pretty much anything that caught my imagination. From drawing zillions of lips and eyes as a child. To painting ole cotton wagon into a ride on roses with the fairy lights.

Painting for years was my forte until someone emailed me this picture of a tiny baby supposedly made out of almond paste. This opened a whole new world for me and such detail I had never seen before. So I ventured out into the world of Sculpting, sculpting each little ear, and finger tip out with a needle or my fingers. Like everything else time passes and the eyes and the hands aren’t as steady as I would like them to be.

So I moved on into another world of.. Gourds.. A passion that was as labor intensive as it was joyful. I learned thru trial and error the joys of  scrubbing until I thought my back would break , to carving and painting them making them into bowls, statues , lamps, tables and yes purses.


Gourd Lamp


Gourd Table


Gourd Purse


My latest venture of Woodburning came about in an unexpected way. I made a huge picture out of matchsticks of a mother owl and her chick on a limb.. The smell of  sulfer permeated the whole neighborhood resulted in the my son suggesting that maybe using a soldering iron on the matches might would be less stressful on the whole family. Thus my first soldering iron! Oh a new world that I met with a grin on my face and a determination to whip it into my will.  Many, many, lets say many, burns later. I think I have finally got it to the point it will not burn me if I don’t try to get it in a choke hold ,while its trying to work with me.

Woodburning of a deer


Everyday is a wonder and its left up to us to open the doors and see the new worlds that are there only waiting for us to discover them.Walk with me as I try to explain some of the short cuts, and long roads I have taken in them, and the new Worlds I hope to discover.