First, I will say for some unknown reason or the blessings of the Lord above, woodburnings to me is like coloring with only two crayolas. Black and brown and the unburned areas serving as white.
When I look at a picture I tend to see the light and dark in them when I envision doing one. To me this makes it easier to work with.
I usually use a cheap soldering iron.
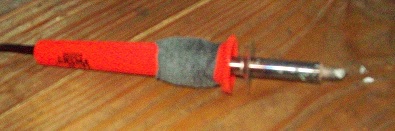
I have the more expensive one (razertip sk) with the temp controller, but I continually find myself grabbing the old soldering iron.
I can control the shading easily depending on the pressure and speed I use, and it doesn’t burn my fingers as bad. So my advice to anyone that is going to try their hand at woodburning to go with the cheaper version first until you have whipped that tool into your control.
Secondly, you will need a very good source of protection for your fingers. I tend to work for hours and hours at a time on any given day, and heat builds up with pressure points and will leave blisters. So protect those fingers! I wrap my handle on the soldering iron with a rubber bandage you can get any Farm supply store for Animals. It clings to itself and will last for months. I will say that the razor tip is wonderful for the tiny areas that your want to shade and the soldering iron tips are just way too thick or wide to reach and not bleed over into another area.
No comments:
Post a Comment